Paper + Embroidery

I am trying out a new (to me) art form; embroidery. But since it is me I am embroidering on paper, photographs and maybe money. I was inspired by a picture of an embroidered envelope I saw on a video. I like using paper as it is stiff and doesn't require a hoop to hold it in place, but care must be taken when making holes as too many will cause the paper to tear. Here are my results so far.

Enjoy!

-Gina

My first attempt at embroidery on paper. 


Practicing French knot and leaf shapes on scrap paper before trying them on the envelope.

What about embroidering on a photograph?

It's a bit messy, but it works.

The long stitches in the background are my attempt at the Japanese Sashiko technique. More practice is needed, but I like the results so far. What do you think?


TInception: or Binding a Tin into a Book

I ordered some beautiful eco-dyed silk noil from Tierney Barden last week and she sent some extra goodies along in the package. One of them was a little yellow tea tin and when I saw it I knew that I wanted to try binding it into a book. I got the idea from Andrea Matus DeMeng in her Propsero's Books class last month. When she was teaching us the coptic stitch she said she had bound a mint tin into a book. I was intrigued and wanted to try it myself.

My daughter Lila saw the first book and joked that I should bind a tin book that fits inside another larger tin and so on, hence the title of this blog and the title of the book she inspired: TInception.

I hope you like the pictures.

-Gina

Mica and Tintype photo cover for my first tea tin bound book.

Coptic stitch is used to sew the signatures and tin together.

Book parts ready to be sewn.

The finished book. I actually resewed this book (not shown) as I made some adjustments on the second one that I wanted to incorporate in this one as well.

Signature on left and tin on right.

Back of the tin and the next signature.

The tin contains some bits Tierney sent me and 3 pamphlet stitched booklets.

Tin contents.


Another signature in the book. I like using vintage papers and photos to give books a sense of time and place.

More book pages/signatures.


TInception; for each book level you descend it becomes an order of magnitude harder to bind! The top level book measures 4 x 2.5 x 1.5 inches.

The bound tin (right).

Book two inside book one. This book measures 2 3/8 x 1 5/8 x 3/4 inches.

The tin bound in book two (right).

Tin book three measures 1 3/8 x 1 3/4 x 1/2 inches. I could only put on a front and back cover before running out of room in the larger tin. It was still the hardest one to bind.

All three books showing their relative sizes.

The 3 little books bound and nestled inside the final tin.

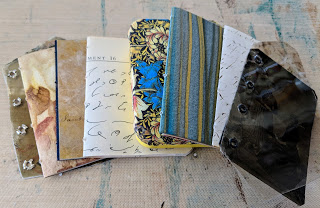
All 3 books showing the photos and mica covers.

The binding of each book.

I used mica and antique writing from autograph books or inscriptions from old books as the back covers. I love the way the natural mica has inclusions that look like ink spots.


Prospero's Books

I recently spent 5 days in Idyllwild, CA at their Art Center taking a class from Andrea Matus DeMeng , intriguingly titled Prospero's Books. We had an ambitious plan to make 4 different books and decorate a wooden box to hold them all in just 4 days! It was a busy and creative time and I didn't finish everything there. I am still not really finished, but here is my version of Prospero's Books so far.

Enjoy!

-Gina

Prospero's Books: The Book of Harsh Geometry, The Book of Mirrors, The Primer of Small Stars, and The Book of Architecture and other Music.

A different arrangement of the books.

The Book of Mirrors, coptic stitched with folded signatures and single sheets bound together.

A page spread in the Book of Mirrors.

The Canadian binding was used for the Book of Architecture and other Music.

A page spread from the same book.

The Primer of Small Stars is of course a small book bound using long stitch.

The case bound Book of Harsh Geometry resonates with me as Geometry was my most difficult class in high school. I barely passed. I also find case binding difficult so they work well together.

Page spread from Harsh Geometry.

The Book of Water, long stitch binding.

I used plastic sheets to create this book's pages as I wanted the contents to look like water.


Mica Book

Making a book with mica pages presents some challenges. If you use natural mica, you can't glue or tape it as the top layer will simply pull away and leave the rest of the mica sheet unattached.  There is also the issue of binding a single piece of mica without a center crease to sew into. One solution is to use Keith Smith's Sewing Single Sheets method, but I don't like sewing if I can fold instead. So, to make my book I used Beauty in Use's slot binding method shown in Claire Van Vliet and Elizabeth Steiner's  Woven and Interlocking Book Structures. The pages vary in size and width, with the bound edge and bottom squared up. This gives the book an irregular top and fore edge, which I like.

Hope you enjoy!

-Gina

Preparing the binding strip.

Mica ready to have the corners cut.

In the middle of adding the mica to the binding. This method uses slits cut into the paper as well as the corners of each page. They go in opposite directions and make a perfect fit when bound.

The finished book. I love this kind of mica with red, blue and black inclusions. It looks like ancient writing or a secret star map.

A top view of the book.

The end.

Sculpting Dyed and Painted Papers

I have been eco-dyeing paper for a few weeks. I also played around with another Leslie Marsh technique which uses paint to print leaves onto black paper. With lots of paper piling up on my work table I decided to turn some of them into a paper sculpture. Here are the results.

Enjoy!

Some of the painted leaf papers. Mom and I used Ranger Dylusions paints and a gel press plate to make these. Roll paint on the leaves, brayer a contrasting color on the gel plate, apply the leaves, place black paper on top and press. This technique is so fun and fast that I made about 20 pages in one sitting. 

I used the painted leaf papers to make the book spine. In my other blog post about this structure I used a single sheet of paper cut and folded to make the spine. Here I used a different sheet for each section then used leftover painted paper as hinges to hold them together.

I used the pale Texoprint paper from week 2 ago for the folded inserts. 
I like the contrast of the dark and light papers.

This is the finished sculpture. I love the shapes and colors and subtle leaf patterns everywhere.


Still Eco-Dyeing: Week 3

I am still playing around with eco-dyeing a month after taking Leslie Marsh's workshop. I usually get distracted by a shiny new technique, but I think this one appeals to my science brain. I am experimenting with different papers, plant materials and water baths. I just want to keep trying out new combinations. Here are the results from this week's batch.

Enjoy!

I used Arches Textwove and Somerset Book paper for this week's project. I cut the large sheets (20 x 26) into 3 long strips, sprinkled leaves on top and rolled them onto my copper tubes. They were tied with twine and boiled for 1.5 hours in water, vinegar and Ranger Distress dye (Vintage Photo). 

1. Spanish moss, onion skin and eucalyptus leaves sprinkled on Arches Textwove.

2. Liquid amber, spanish moss and eucalyptus leaves on Somerset Book paper.


3. Onion skin and liquid amber on Arches Textwove.

The papers still wet from dyeing are number 3, 2, and 1 from left to right. The Arches came out the best again with the Somerset looking pretty, but pale in comparison. The onion skin surprised me with its orange-brown color. I was hoping for purple. The edges of the papers did come out purple so that may be where the color went. The liquid amber seems to be very yellow in the recent batches I have made. I continue to enjoy the process and the results.

Here are the finished papers, cut down and folded to fit in my journal.

 Please check out my next blog to see what I made with some of last week's papers.

Adventures in Eco-Dyeing: Week 2

I am still fascinated with eco-dyeing and spent time making two different batches of paper. I am playing with paper types and ways of dyeing. Here are the results so far.

Enjoy!
Method 1
This dyeing process involved placing leaves and flowers between folded sheets of watercolor paper. They were sandwiched between two ceramic tiles and boiled in water and vinegar for 1.5 hours. RIT dye (Jeans color) was added 10 minutes into the steep time. 

Issues with this method: 1. The color faded quite a bit after the sheets dried so I used Distress Micro Glaze to bring up the color and seal the pages. 2. The center folds on the pages were weakened by the boiling process. Several pages tore either while wet or after drying. 

Conclusions: I like this method of dyeing, both with the addition of the blue dye and sandwiching the paper flat instead of rolling it. There are no string marks and both sides of each page have good coverage with leaf shapes. Also the open pages are mirror images which makes interesting patterns.


The journal I made from the blue and eco-dyed papers.


Method 2

This trial was more like the way we dyed our papers in Leslie Marsh's class. I made cooper tubes from some cooper sheeting I had lying around and stacked paper with leaves then rolled them up around the cooper. I placed a large leaf on the outside of each bundle before rolling so that there would be vegetation on the outside instead of just string. I used 3 kinds of paper in this experiment to see how each would take the tannin and color from the vat. I used Liquitex Muted Pink dye to color this pot as well as eucalyptus bark.

Issues with this method: 1. Rolling the thicker, cover weight paper caused it to wrinkle and tear. 
2. Some of the paper took the dye and tannin well and some didn't. 

Conclusions: I like this method for the thinner paper and I can use a smaller pot and still dye large sheets of paper without creasing them before boiling. 


Dyed paper while still wet. 
These strong colors are on Arches Textwove and cover weight Neenah paper.


These very pale papers were dyed at the same time as those above, but this is Texoprint paper and it didn't take the colors as well. I kind of like the ghost-like prints though.


Cover weight paper dry.

Arches Textwove paper dry.

Texoprint paper dry.


Dyeing Paper and Workshop Pictures

I took a workshop last weekend with Leslie Marsh and she taught us how to eco-dye paper using leaves, onion skin and water dyed with walnut shells. I have wanted to try this for some time and it was so easy and thrilling to see the results that I wanted to try it at home. I looked up ways to make dye from natural materials and found this site. I made 3 dyes: avocado skin, avocado pit, and pomegranate skin. My favorite is the avocado pit as it makes a delicate pink dye. The pomegranate skin was supposed to be maroon, but came out yellow instead. Here are some of the dyeing effects I got from the three dyes.

Enjoy!

Avocado pit dyed papers. The small one was stamped and clear embossed before dyeing.

Avocado skin dyed papers.


Pomegranate skin dyed papers.

Some of the ephemera I dyed using the three dyes.

Trying out different techniques. This one was dipped in a puddle of dye, dried and dipped again. I repeated this 3 times, drying between each application of dye. I like the details and pooling this produces.

This paper was dyed with avocado pit dye then dried. Then I used a spray bottle with the same dye to get droplets on the paper. I dried the paper immediately with a heat gun so the drops wouldn't spread out and disappear.

This paper was dyed with avocado pit dye, dried, stamped and embossed then dyed again with avocado skin dye. I think this one is my favorite. I like the way the embossed part resists the second layer of dye and shines while the non-embossed paper is dull. It's a nice contrast.

Eco-dyed papers from Leslie Marsh's workshop: Stamped Nature Bound.

My workshop book in pieces before I coptic stitched it together.


Artist's Book Mantra

I want to share my method for creating a new artist's book. I don't always do it this way, but often I do and maybe you do too...

Idea: What if I make a book using the twist fold, but connect four of them together on a single concertina folded sheet of paper?

Inspiration: For content, I remember Hedi Kyle showing us her insect stencils last weekend. I was expecting them to be clear plastic stencils with bugs cut out. On the contrary, they were pieces of blue paper that bugs had eaten into forming irregular and shifting shapes. I have some old Japanese books here in the studio that are riddled with insect trails. I grabbed one and used four
consecutive pages. The stencils change over the pages in interesting and random ways.

Mantra: Keep it simple!

Materials: Choosing materials usually comes down to what I have handy in the studio and today I chose a piece of hand made abaca paper (from Helen Hiebert) and some tracing paper that I colored with alcohol inks a while ago. I used soft wax crayons (by Tim Holtz) on the stencils and here are the results.

Enjoy,

Gina
Pages from old Japanese book with the insect trails I used in this piece.

Inked and stenciled pages before insertion. 
Note how the insect tracks change over the four pages.


Abaca paper with creases.

Starting to fold up the paper.

Twist folds complete.

Folds flattened.

Pages inserted.

Book backlit.


Cover to Cover Workshop

Seth Apter came to town this week to teach two workshops for San Diego Book Arts. I had the pleasure of taking "Cover to Cover" in which we used old book covers as pages for a mixed media book. I haven't done much mixed media in my art life, although I adore it. Seth made it both accessible and fun by breaking down the process into its component parts. We made many layers of color and texture that managed to form a cohesive whole when we were finished. Seth kept reminding us that an ugly page was just one layer away from beauty and if we didn't like something keep adding to it until we did. Good advice and a good mantra for life as well. Thanks Seth for a wonderful experience!

Enjoy the pictures.

-Gina


All About ATC's

Today's topic is ATC's or Artist's Trading Cards. ATC's are 3.5 x 2.5 inch cards that artists create with any type of media they like. ATC's can be painted, rubber stamped, covered in collage, mixed media, etc. If it will fit on a 3.5 by 2.5 inch piece of paper then it works. There are groups that meet and trade, there are online trading sites or you can simply trade with your friends. The only catch is that these cards have to be traded, not sold. I have been making them for a few years off and on, but recently I have been making lots of them. I try to make sets of 9 as my album has page protectors with 9 slots. Here are some examples of the ATC's I have created recently. Enjoy and if you want to trade, let me know.

-Gina


"Cameo" set of 4


"Back of Fashion" set of 5


"Advice" set of 4


"Water Nymphs" set of 9


"Beaded Fragments" set of 9


"Beaded Fragments" detail. I made the Greek statue fragment with collaged papers that I tore into the body shape. I then applied glue and clear micro beads to give it some sparkle. I stamped the background with "Greeking" text and Tim Holtz Brushed Corduroy and Antique Linen and used the inks on the edges too.


Detail of "Water Nymphs" using Tim Holtz Brushed Corduroy and Antique Linen again with his marble paper stamp. The image was stamped on a glossy photograph of my family in blue rain ponchos that we wore on the Maid of the Mist in Niagara Falls.

Mixed Media Book Covers

Today's post is a blast from my past. I was recently visiting my mom and she showed me a set of collaged vintage book covers I made her several years ago. I had forgotten about them, but was inspired to make myself a set. Mine are wrapped in a packet and contain poems about birds. Please see pictures below for materials and the finished project that was inspired by an article from Somerset Studio called Poetic Packet Collages.

This post is also inspired by Mixed Media World challenge #3. I used vintage book covers, stamps, maps, and images from old dress patterns to make the covers. Enjoy, I'm off to the studio to make more!

-Gina


Finished Packet


Contents of the packet; front and back covers with collage elements and poems on tracing paper.


Component 1: Vintage dress pattern images.


Component 2: Vintage book covers.


Component 3: Maps, marbled paper, etc.


Component 4: Vintage stamps and samples of marbled paper.


Component 5:Tracing paper with topographic lines in pencil to add depth to the packet wrapper.